Overview : Here is a comprehensive Guide covering ‘what is LLP registration’ and also the step-by-step Registration process of LLP in India. Get to know about everything from Application filing to documentation requirements; all have been explained in a detailed way for your clear and comprehensive understanding. It is crucial to have an in-depth knowledge of how to register an LLP or registration process of LLP as it may streamline the process along with significantly lowering potential time consumed on the procedure for registration of LLP.
Limited Liability Partnerships or LLPs are corporate structures established under the LLP Act of 2008. These are hybrid structures, combining the best of traditional partnerships with that of limited companies. The result is a partnership structure offering limited liability protection to partners. More importantly, LLPs are registered entities and have a distinct legal identity separate from their partners. This allows them to carry out all legal and financial formalities under their own name. This blog provides better clarity on what is an LLP Registration and the registration process of LLP helping you register your LLP efficiently!
The LLP Registration process in India is extremely quick, easy, and cost-effective owing to the completely online mode of filing. The application for LLP Registration along with all the necessary documents are filled out and uploaded on the MCA Website. Even the requisite application fee for LLP Registration is paid online through net banking options. The registration process of LLP has been made mandatory under the LLP Act. So, operating an LLP without registering it with the ROC is illegal and punishable in India. Read further for complete information on the Registration process of LLP.
What is the LLP Registration Process and Why is it Required?
LLP Registration is a legal process by which Limited Liability Partnerships get incorporated or registered by the Registrar of Companies. The process provides a distinct legal identity to the business and a Certificate that proves its legal existence. Not only is the Registration process of LLP mandatory under the LLP Act, but it also provides several practical benefits to the business and its stakeholders which have been discussed below.
Advantages of LLP Registration Process in India
The Registration process of LLP offers several advantages to businesses as well as other stakeholders like the partners, creditors, employees, customers, and regulatory authorities. Some of the most prominent of these advantages have been mentioned below. Understanding the advantages of the LLP Registration process is a significant step before undergoing the procedure for registration of LLP in India.
- Legal Recognition and Credibility: LLP registration process provides legal recognition to the business entity. It establishes the LLP as a separate legal identity distinct from its partners. This enhances the credibility of the LLP and instils trust among clients, suppliers, and investors.
- Limited Liability Protection: One of the other key benefits of the registration process of LLP is limited liability protection for partners. LLP registration ensures that the personal assets of partners are protected while paying off the business liabilities and debts. This means that partners are not personally liable for the LLP’s obligations, reducing their financial risks while operating the business.
- Perpetual Succession: LLP registration process ensures perpetual or continued existence of the LLP. This indicates that the LLP continues to exist even if there are changes in the partners. The LLP can enter into contracts, hold property, and conduct business operations in its own name, irrespective of changes in the partner composition.
- Flexibility and Ease of Operations: LLP registration provides flexibility in terms of management and decision-making. It allows partners to define their roles and responsibilities in the LLP agreement. The LLP structure also offers ease of operations, as it has fewer compliance requirements compared to its other corporate counterparts like companies.
- Tax Benefits: LLP registration offers tax advantages. LLPs are treated as separate entities for tax purposes, allowing partners to take advantage of tax planning strategies and deductions available to the business.
- Access to Funding and Business Opportunities: LLP registration enables the LLP to access funding from banks, financial institutions, and venture capitalists. It also opens up opportunities for collaborations, contracts, and government tenders, as many organisations prefer to engage with registered entities as opposed to unregistered ones.
LLP Registration Process in India: A Step-by-Step Guide
As mentioned earlier, the Registration process of LLP is 100% online and can be completed on the official website of the MCA (Ministry of Corporate Affairs). The application form used for carrying out the procedure for registration of LLP is web-based and can be accessed on the MCA website itself. Also, all the documents can be uploaded digitally with the form to complete the process. The detailed steps that you need to follow have been explained below.
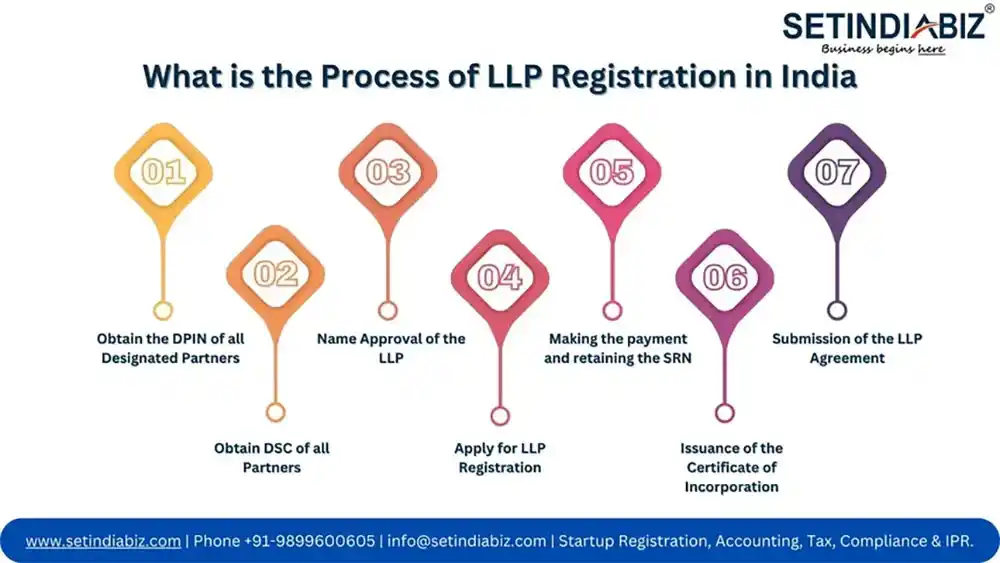
Step 1: Obtain the DPIN of all Designated Partners
The Designated Partners in an LLP are responsible for controlling its management and making key decisions on subject matters beyond the day-to-day business operations. Hence, their role in the establishment and incorporation of the LLP is immensely important. Before you begin the Registration process of LLP, you must make sure that all the current designated partners have been allotted their DPINs. DPIN or Designated Partners Identification Number is a unique number allotted by the MCA to every designated partner of the LLP. To apply for a DPIN, you can file an application to the Ministry of Corporate Affairs in form DIR 3.
Step 2: Obtain DSC of all Partners
The form for incorporation of LLP is web-based, and requires to be signed using the digital signature of the authorised designated partner. For this purpose, any two designated partners can be authorised by all the other partners of the LLP. Moreover, the documents uploaded with the form may require attestation by all the partners. So, it is recommended that all partners acquire the prescribed class of Digital Signature Certificate or DSC beforehand. This would ensure a smooth and hassle free registration process of LLP.
Step 3: Name Approval of the LLP
The name of your LLP must be selected according to the guidelines prescribed in various statutes like the Companies Act, the Trademark Act, and the Names and Emblems Act. In essence, the name of your LLP must be unique, original and representative of your business activity. Choosing names that are similar to other registered Companies, LLPs or trademarks must be avoided. Also, the name must not contain words that show government patronage as LLP is a privately-owned entity.
The selected name of your LLP must be reserved with the ROC, for which you need to file the RUN-LLP form. You can propose two names per application, which will be examined by the registrar. The name that is found to be valid will be reserved or approved for your LLP registration process. The ROC also provides two chances of resubmission if the proposed names are invalid. Once the name is approved, a name approval letter is issued to the LLP which is valid only for 90 days. The applicant must complete the rest of the procedure for Registration of LLP within these 90 days only.
Step 4: Apply for LLP Registration
The next step in the LLP registration process is filing the application. The application can be accessed on the official website of the Ministry of Corporate Affairs. Details that need to be submitted include the names, addresses, and capital contributions of all partners, names and DPINs of all designated partners, the name and registered address of the LLP, and other related information. To support these details, the applicant needs to upload certain documents discussed further in this blog. These documents must be self attested by the partners before submission. Finally, the authorised designated partner will have to sign the application using his digital signature certificate, which will further be certified by a practising Company Secretary.
Step 5: Making the payment and retaining the SRN
After submitting the form, you will be automatically redirected to the payment page. Make the payment. A challan will be generated, along with a Service Request Number (SRN). Keep the challan safe because you will need it for future reference. Once the form has been approved by the relevant Ministry official, you will receive an email, and the status of the form will be changed to Approved.
Step 6: Issuance of the Certificate of Incorporation
The submitted application will then be examined by the ROC. If he is satisfied that the application has been filed accurately, with the correct details and documents, ROC will approve your application and finally register your LLP. As a conclusive proof of such registration, ROC will issue a Certificate of Registration in the name of the LLP. The certificate can be downloaded online from the MCA website itself.
Step 7: Submission of the LLP Agreement
Like any other Partnership business, the foundation of an LLP is also based on a deed or agreement mutually signed by the partners. This agreement must be stamped by a public notary for which the applicable stamp duty has to be paid. LLP Agreement must be submitted to the Registrar of Companies within 30 days from the date of incorporation of the LLP.
Key Documents for LLP Registration Process In India
LLP Registration process is incomplete without appropriate documentation. So, before you file the application for LLP registration, make sure that you have prepared or drafted all the requisite documents. If you need any assistance, contact our experts. At Setindiabiz, we provide full documentation assistance for LLP Registration in India. The table below mentions all the documents required for LLP Registration for your detailed understanding.
| Documents of all Partners | Registered Office Address |
|---|---|
| Colour PhotoPAN & AadharId Proof: (Passport, Voter ID, Driving License, Aadhar)Address Proof: (Telephone bill / Gas bill / Electricity Bill / Bank Statement not older than 2 months) | Proof of Address: (Telephone bill / Gas bill / Electricity bill / Water Bill not older than 2 months)No Objection Certificate (NOC) From Owner |
Conclusion
The Registration process of LLP in India is a crucial step for businesses looking to enjoy the benefits of a traditional partnership structure with benefits like limited liability protection, legal recognition, and flexibility in conducting operations. This process, conducted entirely online, involves obtaining DPINs and DSCs for designated partners, selecting a unique name, filing the application with necessary documentation, making the payment of application fee, and ultimately receiving the Certificate of Incorporation.
Registering an LLP not only provides legal identity to the business, but also opens doors to easy funding, credit, and business opportunities. Therefore, understanding ‘how to register an LLP’ or following the procedure for Registration of LLP is crucial for all aspiring entrepreneurs looking forward to establishing their startups in India.
FAQ’s
How long does the LLP Registration process take in India?
What is the overall cost of the LLP Registration process?
Who registers an LLP in India?
Is the LLP Agreement filed during the LLP Registration process?
What purpose does DSC have in the LLP Registration process?
Related Articles :
In This Article
Author Bio
Setindiabiz Editorial Team is a multidisciplinary collective of Chartered Accountants, Company Secretaries, and Advocates offering authoritative insights on India’s regulatory and business landscape. With decades of experience in compliance, taxation, and advisory, they empower entrepreneurs and enterprises to make informed decisions.